
Browse the operator manual
Start here
Get started with Operations CenterTake a trip from Draft to departureUse Dashboard and RadarVideo guidesOrganization setup
Set up your organizationSet company identity and portal brandingSet editor, schedule, and writing defaultsConfigure traveler forms, legal content, and the public catalogConfigure payment providers and payment documentsConfigure automatic emailSet monitoring and notification thresholdsCreate and build
Create a tripImport a trip with AIComplete trip details and residencesBuild the itineraryAdd flights and transfersAssign field staff and partnersPublish and sell
Configure and publish the traveler portalDesign the traveler pageGive and remove portal accessConfigure pricing and collect paymentsReview and approve join requestsManage travelers and roomingWork with sales and FinancePrepare and operate
Prepare a trip for departureManage files and messagesMonitor live operationsSaved content and contacts
Reuse saved trip contentMaintain field staff, partners, and suppliersReference
Trip status referenceManage the tour listFix common problemsPublish and sell
Configure and publish the traveler portal
Set the trip language, booking terms, join requests, and catalog visibility, then publish the traveler page.
Before you begin
- Trip details and itinerary reviewed
- Pricing decided
You will learn to
- Understand the public page, catalog listing, review page, and private links
- Complete Portal → Trip settings
- Publish the trip
Reviewed September 2026
Four ways travelers reach a trip
| Access | What it is |
|---|---|
| Public page | The trip’s page, available from Published onwards |
| Catalog listing | The trip appears in your public catalog. Turn it off to keep the page reachable by direct link only |
| Review page | An unlisted page available while the trip is Pending approval. Anyone with the address can open it |
| Private link | A link you create for a traveler, staff member, partner, or guest, with an expiry |
Complete Trip settings
- Open Portal → Trip settings.
- Choose the Tour language.
- Under booking terms, choose Inherit organization terms, Overwrite for this tour, or Disable for this tour. If you overwrite, enter the text and choose whether travelers must accept it.
- Turn on Accept join requests for this trip and set the minimum and maximum spots. Choose whether pending requests count toward capacity and whether the trip confirms automatically when the minimum is reached.
- Set catalog visibility and tags.
- Select Save.
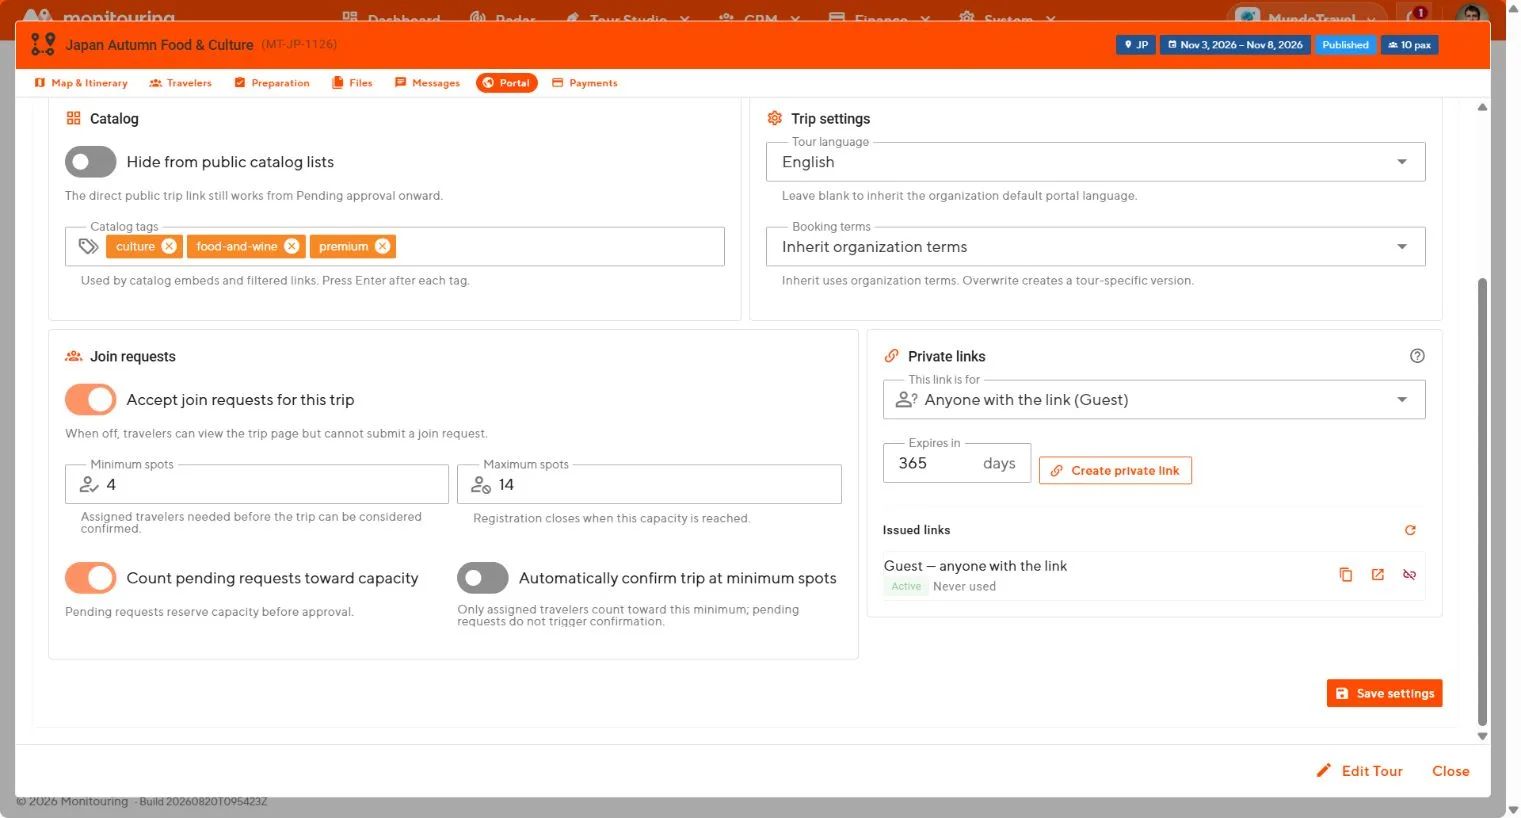
Turning off join requests makes the page view-only and turns off portal payment collection for the trip.
Design the page
Select Portal page builder to arrange the blocks, images, and layout of the traveler page. See Design the traveler page.
Share for review
To let a manager or client review the page before release, change the status to Pending approval and send them the page address. The trip stays out of the catalog and cannot take bookings. Return to Draft for changes, or publish.
Publish
- Check the dates, itinerary, price, terms, and join settings.
- In All Tours or the editor, change the status to Published and confirm.
- Open the traveler page from Portal and check it on desktop and mobile.
- Share the page address, or create a private link.

A Published trip cannot return to Draft. Use Pending approval if the review may lead to structural changes.
The traveler page is live with the intended language, terms, join settings, and catalog visibility.