
Browse the operator manual
Start here
Get started with Operations CenterTake a trip from Draft to departureUse Dashboard and RadarVideo guidesOrganization setup
Set up your organizationSet company identity and portal brandingSet editor, schedule, and writing defaultsConfigure traveler forms, legal content, and the public catalogConfigure payment providers and payment documentsConfigure automatic emailSet monitoring and notification thresholdsCreate and build
Create a tripImport a trip with AIComplete trip details and residencesBuild the itineraryAdd flights and transfersAssign field staff and partnersPublish and sell
Configure and publish the traveler portalDesign the traveler pageGive and remove portal accessConfigure pricing and collect paymentsReview and approve join requestsManage travelers and roomingWork with sales and FinancePrepare and operate
Prepare a trip for departureManage files and messagesMonitor live operationsSaved content and contacts
Reuse saved trip contentMaintain field staff, partners, and suppliersReference
Trip status referenceManage the tour listFix common problemsPublish and sell
Give and remove portal access
Create private trip links and traveler links, send them, and revoke them when needed.
Before you begin
- The recipient is on the trip as a traveler, staff member, or partner
You will learn to
- Create private trip links and traveler links
- Send access by email
- Revoke access
Reviewed September 2026
Link types
| Link | Use for |
|---|---|
| Targeted trip link | Private access to the trip page for one traveler, staff member, or partner |
| Guest trip link | Private access for anyone who has the link |
| Traveler link | Lets one traveler view or submit their own details |
| Account invitation | Ongoing signed-in access connected to a traveler record |
Hiding a trip from the catalog does not make its public page private. Use a private link when the trip must stay confidential.
Create a private trip link
- Open Portal.
- Under private links, choose A traveler on this trip, A field staff member on this trip, A partner on this trip, or Anyone with the link (Guest).
- Set the expiry from 1 to 365 days.
- Create the link and copy it.
- Send it directly to the recipient.
The list shows each link as Active, Expired, or Revoked, with its last use.
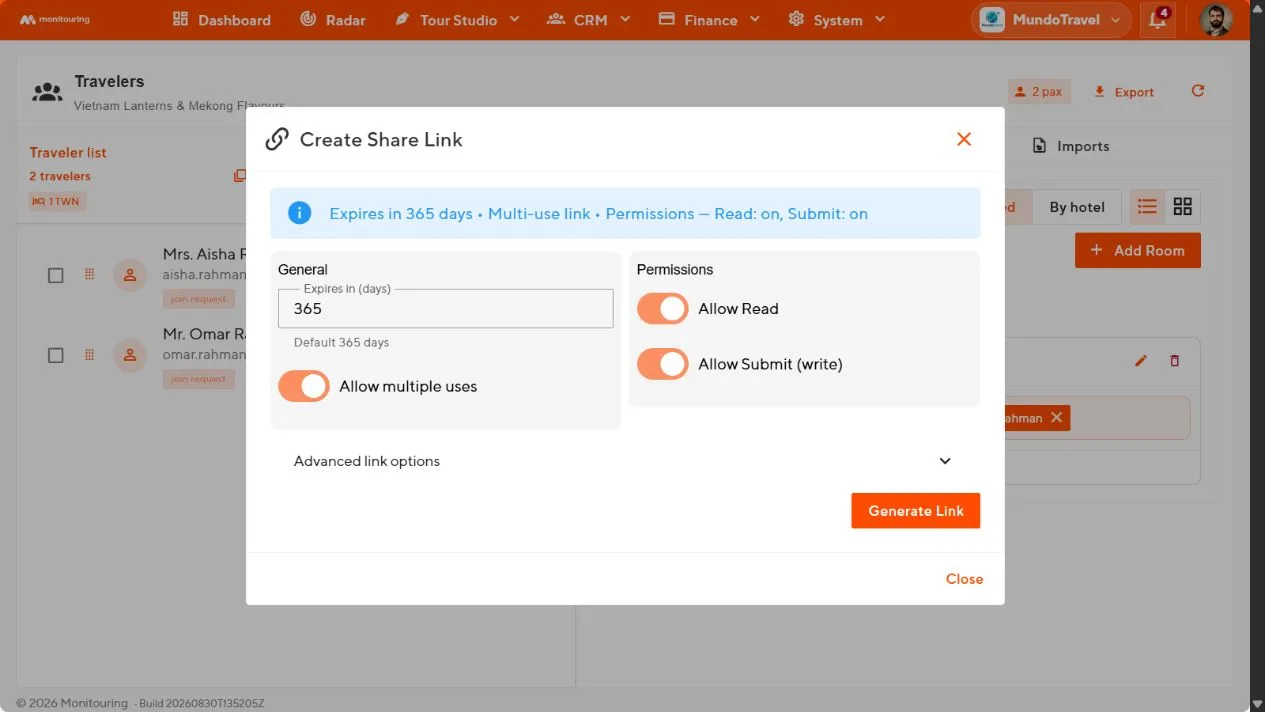
Create a traveler link
- Open Travelers and find the traveler.
- Select Share traveler.
- Set the expiry.
- Turn Allow multiple uses off for one-time use.
- Turn on Allow Read so the traveler sees saved details, and Allow Submit so they can send changes.
- Generate the link, copy it, and send it.
Send access by email
In Travelers, select the recipients and choose Email. Choose the message topic. Operations Center sends a separate personalized email to each traveler. When you include files, each traveler receives a private link to the trip.
Review all links
System → Shared Links / Access Audit lists every issued link with its status, expiry, uses, and permissions. Send recipients only the Short URL or Share URL.
Remove access
- To stop a link, revoke it in Portal or in Shared Links / Access Audit.
- To remove a signed-in account from a traveler, unlink the account in the traveler’s record. The traveler and trip history stay.
- If a file should no longer be available, remove it from the trip or change its access setting.
Treat private links like passwords. Do not paste them into group chats, screenshots, or support tickets.
Only the intended people can open the trip or traveler details, and every link has an expiry.