
Browse the operator manual
Start here
Get started with Operations CenterTake a trip from Draft to departureUse Dashboard and RadarVideo guidesOrganization setup
Set up your organizationSet company identity and portal brandingSet editor, schedule, and writing defaultsConfigure traveler forms, legal content, and the public catalogConfigure payment providers and payment documentsConfigure automatic emailSet monitoring and notification thresholdsCreate and build
Create a tripImport a trip with AIComplete trip details and residencesBuild the itineraryAdd flights and transfersAssign field staff and partnersPublish and sell
Configure and publish the traveler portalDesign the traveler pageGive and remove portal accessConfigure pricing and collect paymentsReview and approve join requestsManage travelers and roomingWork with sales and FinancePrepare and operate
Prepare a trip for departureManage files and messagesMonitor live operationsSaved content and contacts
Reuse saved trip contentMaintain field staff, partners, and suppliersReference
Trip status referenceManage the tour listFix common problemsOrganization setup
Set company identity and portal branding
Add company details, then set the colors, fonts, logo, and language travelers see.
Before you begin
- Organization administrator access
- Company details, logo, and brand colors
You will learn to
- Enter company and contact details
- Apply consistent traveler-facing branding
Reviewed September 2026
System → Settings → Organization and Portal Branding
Add company information
Open Organization and complete the fields.
| Field | Where it appears |
|---|---|
| Display name | Public pages and documents |
| Legal name | Formal business identification |
| Contact email, Phone, Website | Contact details shown to travelers and partners |
| Address line 1 and 2, City, Region, Postal code, Country | Company address |
Use the name travelers recognize as the display name and the registered name as the legal name. Select Save.
Set colors, fonts, and language
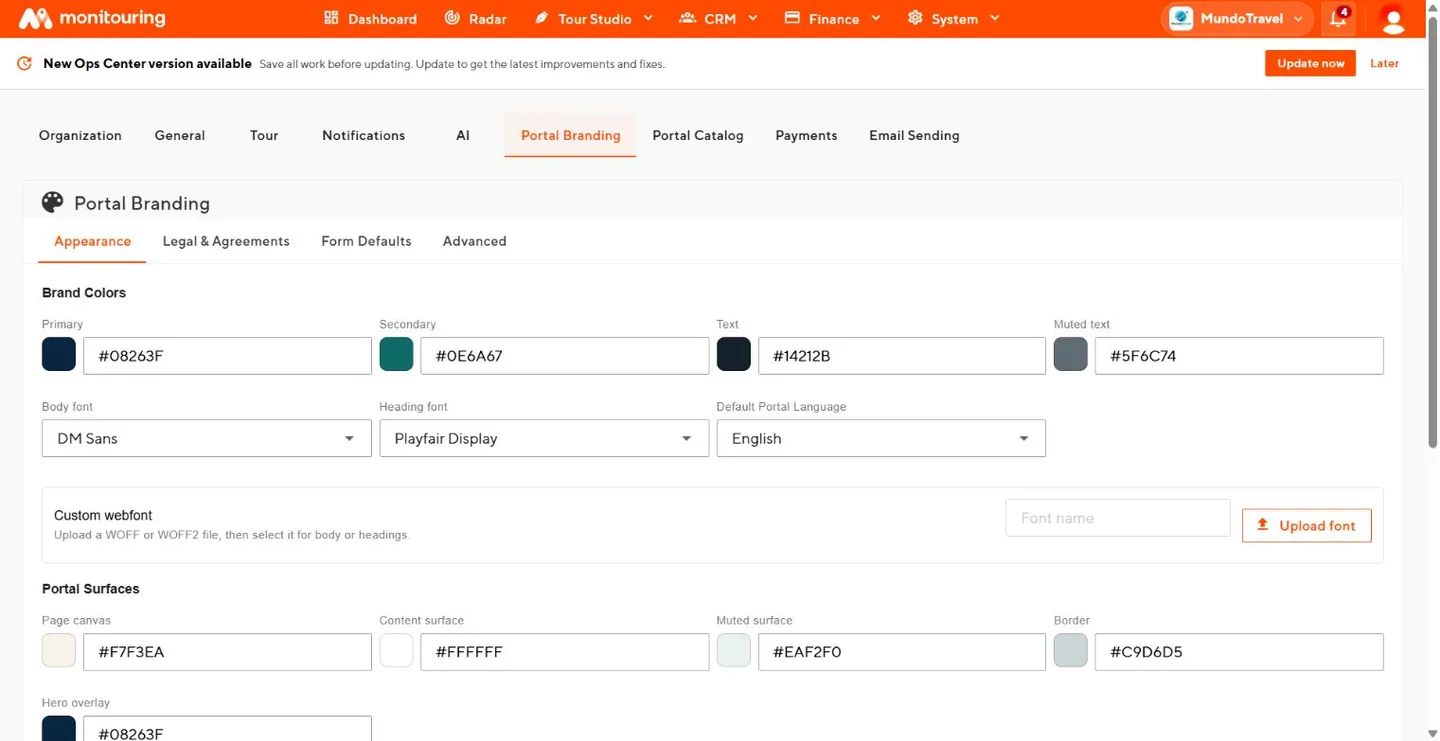
Open Portal Branding → Appearance.
- Set the Primary and Secondary brand colors.
- Set the Text and Muted text colors.
- Set the Page canvas, Content surface, Muted surface, Border, and Hero overlay colors.
- Choose the Body font and Heading font. To use your own font, upload a WOFF or WOFF2 file under Custom webfont and select it.
- Choose the Default Portal Language.
- Upload the logo and browser icon.
- Check the preview, then select Save.
Check the result
- In the preview, check headings, paragraphs, buttons, links, and muted text for contrast.
- Switch between desktop and mobile widths.
- Check each language you use, including right-to-left text.
- Open the traveler page of a Published test trip.
Traveler pages show your company name, logo, colors, fonts, and default language.